1、文件
| 文件 | 说明 |
generate_digit_atlas.py |
生成脚本 |
T_DigitAtlas_16.png |
输出图集 |
字符集格式说明.md |
本说明 |
依赖:pip install pillow
2、图集格式
- 布局:横向 1 行,固定 16 格
- 默认尺寸:
4096 × 256(每格256 × 256) - 像素格式:RGBA PNG,白字、透明底
- 材质约定:
TotalChars = 16,用floor(UV.x * 16)取格子【这里直接在材质里面用的custom节点】
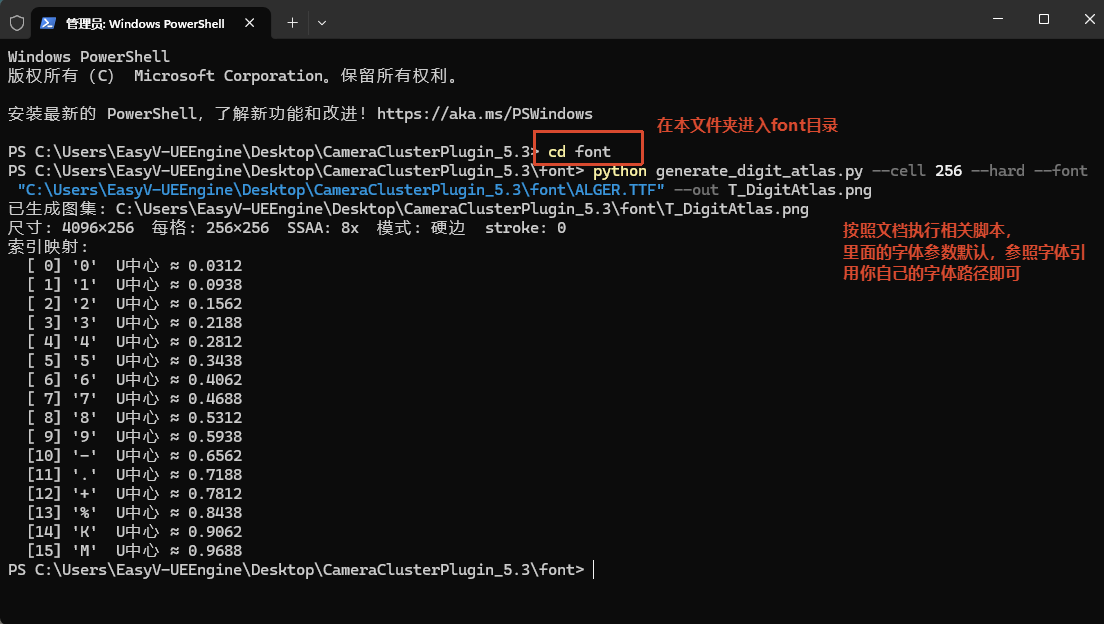
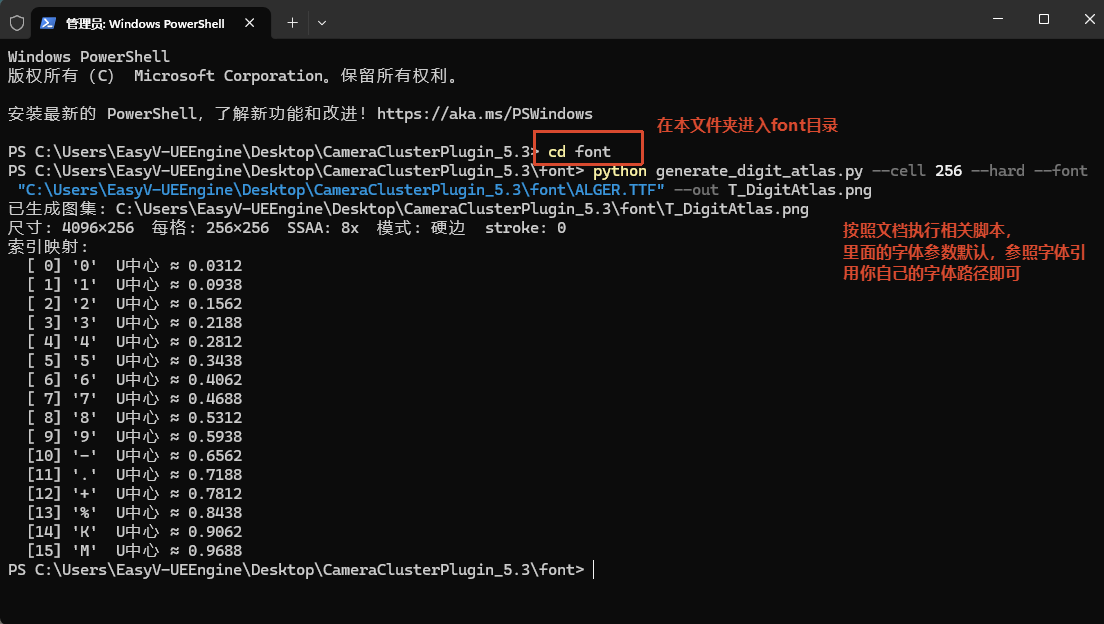
字符顺序(从左到右,索引 0 ~ 15):
0 1 2 3 4 5 6 7 8 9 - . + % K M| 索引 | 字符 | U 中心(约) |
| 0 | 0 |
0.0312 |
| 1 | 1 |
0.0938 |
| 2 | 2 |
0.1562 |
| 3 | 3 |
0.2188 |
| 4 | 4 |
0.2812 |
| 5 | 5 |
0.3438 |
| 6 | 6 |
0.4062 |
| 7 | 7 |
0.4688 |
| 8 | 8 |
0.5312 |
| 9 | 9 |
0.5938 |
| 10 | - |
0.6562 |
| 11 | . |
0.7188 |
| 12 | + |
0.7812 |
| 13 | % |
0.8438 |
| 14 | K |
0.9062 |
| 15 | M |
0.9688 |
不要改字符顺序或槽位数,否则材质/Niagara 里的索引打包会对不上。
3、怎么生成
#!/usr/bin/env python3
"""
生成数字图集纹理(16 字符横向条带)— 高清超采样版

字符顺序(从左到右,索引 0~15):
  0 1 2 3 4 5 6 7 8 9 - . + % K M

默认:每格 256px → 总尺寸 4096×256
内部超采样后再缩小。字符集固定 16 槽,材质 TotalChars=16。

用法:
  python generate_digit_atlas.py
  python generate_digit_atlas.py --cell 256 --hard
  python generate_digit_atlas.py --font "C:/Windows/Fonts/arialbd.ttf" --font-size 180
"""

from __future__ import annotations

import argparse
from pathlib import Path

from PIL import Image, ImageDraw, ImageFont

CHARS = list("0123456789-.+%KM")
assert len(CHARS) == 16


def load_font(font_path: str | None, font_size: int) -> ImageFont.FreeTypeFont | ImageFont.ImageFont:
    candidates = []
    if font_path:
        candidates.append(font_path)
    # 等宽粗体优先:数字对齐更好、笔画更匀
    candidates.extend(
        [
            r"C:\Windows\Fonts\consolab.ttf",
            r"C:\Windows\Fonts\CascadiaCode.ttf",
            r"C:\Windows\Fonts\courbd.ttf",
            r"C:\Windows\Fonts\arialbd.ttf",
            r"C:\Windows\Fonts\seguisb.ttf",
            r"C:\Windows\Fonts\consola.ttf",
            r"C:\Windows\Fonts\arial.ttf",
        ]
    )
    for path in candidates:
        try:
            return ImageFont.truetype(path, font_size)
        except OSError:
            continue
    return ImageFont.load_default()


def draw_centered_char(
    draw: ImageDraw.ImageDraw,
    char: str,
    cell_x: int,
    cell_w: int,
    cell_h: int,
    font: ImageFont.ImageFont,
    fill: tuple[int, int, int, int],
    stroke_width: int = 0,
    stroke_fill: tuple[int, int, int, int] | None = None,
    baseline_bbox: tuple[int, int, int, int] | None = None,
) -> None:
    bbox = draw.textbbox((0, 0), char, font=font, stroke_width=stroke_width)
    tw = bbox[2] - bbox[0]
    th = bbox[3] - bbox[1]
    x = cell_x + (cell_w - tw) / 2 - bbox[0]
    # 小数点按数字底对齐(如 12.5),避免被格子垂直居中后显得偏高
    if char == "." and baseline_bbox is not None:
        ref_th = baseline_bbox[3] - baseline_bbox[1]
        ref_y = (cell_h - ref_th) / 2 - baseline_bbox[1]
        y = ref_y + baseline_bbox[3] - bbox[3]
    else:
        y = (cell_h - th) / 2 - bbox[1]
    kwargs = {"font": font, "fill": fill}
    if stroke_width > 0:
        kwargs["stroke_width"] = stroke_width
        kwargs["stroke_fill"] = stroke_fill or fill
    draw.text((x, y), char, **kwargs)


def harden_edges(img: Image.Image, threshold: int = 128) -> Image.Image:
    """硬边二值化(会锯齿)。"""
    px = img.load()
    w, h = img.size
    for y in range(h):
        for x in range(w):
            _, _, _, a = px[x, y]
            if a >= threshold:
                px[x, y] = (255, 255, 255, 255)
            else:
                px[x, y] = (0, 0, 0, 0)
    return img


def premultiply_coverage(img: Image.Image) -> Image.Image:
    """抗锯齿软边 + 预乘:RGB=A=覆盖度,消除白色虚描边。"""
    px = img.load()
    w, h = img.size
    for y in range(h):
        for x in range(w):
            r, g, b, a = px[x, y]
            cov = a
            if cov == 0 and (r | g | b):
                cov = (r + g + b) // 3
            px[x, y] = (cov, cov, cov, cov)
    return img


def generate_atlas(
    cell_w: int,
    cell_h: int,
    font_path: str | None,
    font_size: int | None,
    fill: tuple[int, int, int, int],
    ssaa: int,
    stroke_width: int,
    hard: bool,
    hard_threshold: int,
) -> Image.Image:
    ssaa = max(1, ssaa)
    hi_w = cell_w * ssaa
    hi_h = cell_h * ssaa
    width = hi_w * len(CHARS)
    height = hi_h

    img = Image.new("RGBA", (width, height), (0, 0, 0, 0))
    draw = ImageDraw.Draw(img)

    if font_size is None:
        font_size = int(min(hi_w, hi_h) * 0.78)
    else:
        font_size = font_size * ssaa

    # 不描边,避免白边
    hi_stroke = 0
    font = load_font(font_path, font_size)
    # 用数字 "0" 的包围盒作为小数点底对齐参考
    baseline_bbox = draw.textbbox((0, 0), "0", font=font, stroke_width=hi_stroke)

    for i, ch in enumerate(CHARS):
        draw_centered_char(
            draw,
            ch,
            i * hi_w,
            hi_w,
            hi_h,
            font,
            fill,
            stroke_width=hi_stroke,
            stroke_fill=fill,
            baseline_bbox=baseline_bbox,
        )

    if hard:
        img = harden_edges(img, hard_threshold)
        if ssaa > 1:
            img = img.resize((cell_w * len(CHARS), cell_h), Image.Resampling.NEAREST)
    else:
        if ssaa > 1:
            img = img.resize((cell_w * len(CHARS), cell_h), Image.Resampling.LANCZOS)
        img = premultiply_coverage(img)

    return img


def parse_rgba(text: str) -> tuple[int, int, int, int]:
    parts = [int(p.strip()) for p in text.split(",")]
    if len(parts) == 3:
        parts.append(255)
    if len(parts) != 4:
        raise argparse.ArgumentTypeError("颜色格式应为 R,G,B 或 R,G,B,A")
    for v in parts:
        if not 0 <= v <= 255:
            raise argparse.ArgumentTypeError("颜色分量须在 0~255")
    return parts[0], parts[1], parts[2], parts[3]


def main() -> None:
    parser = argparse.ArgumentParser(description="生成高清 16 字符数字图集 PNG")
    parser.add_argument(
        "--cell",
        type=int,
        default=256,
        help="单字符格子边长(默认 256 → 总宽 4096;越大越清晰)",
    )
    parser.add_argument("--cell-w", type=int, default=None, help="格子宽度")
    parser.add_argument("--cell-h", type=int, default=None, help="格子高度")
    parser.add_argument("--font", type=str, default=None, help="字体文件路径")
    parser.add_argument("--font-size", type=int, default=None, help="最终图字号(超采样前会自动放大)")
    parser.add_argument(
        "--ssaa",
        type=int,
        default=8,
        help="超采样倍数(默认 8:边缘更平滑)",
    )
    parser.add_argument(
        "--stroke",
        type=int,
        default=0,
        help="描边宽度(最终像素;默认 0,不要白色虚描边)",
    )
    parser.add_argument(
        "--hard",
        action="store_true",
        default=False,
        help="硬边模式(锯齿明显,一般不推荐)",
    )
    parser.add_argument(
        "--soft",
        action="store_true",
        help="软边抗锯齿+预乘(默认;无白描边、边缘平滑)",
    )
    parser.add_argument(
        "--hard-threshold",
        type=int,
        default=128,
        help="硬边 Alpha 阈值 0~255(默认 128)",
    )
    parser.add_argument(
        "--color",
        type=parse_rgba,
        default=(255, 255, 255, 255),
        help="文字颜色 R,G,B[,A]",
    )
    parser.add_argument(
        "--out",
        type=Path,
        default=Path(__file__).resolve().parent / "T_DigitAtlas_16.png",
        help="输出 PNG 路径",
    )
    parser.add_argument("--guide", action="store_true", help="额外输出带格子线预览图")
    args = parser.parse_args()

    cell_w = args.cell_w or args.cell
    cell_h = args.cell_h or args.cell
    hard = args.hard and not args.soft

    atlas = generate_atlas(
        cell_w,
        cell_h,
        args.font,
        args.font_size,
        args.color,
        args.ssaa,
        args.stroke,
        hard,
        args.hard_threshold,
    )
    args.out.parent.mkdir(parents=True, exist_ok=True)
    atlas.save(args.out)
    print(f"已生成图集: {args.out.resolve()}")
    print(
        f"尺寸: {atlas.size[0]}×{atlas.size[1]}  每格: {cell_w}×{cell_h}  "
        f"SSAA: {args.ssaa}x  模式: {'硬边' if hard else '软边'}  stroke: {args.stroke}"
    )
    print("索引映射:")
    for i, ch in enumerate(CHARS):
        print(f"  [{i:2d}] '{ch}'  U中心 ≈ {(i + 0.5) / len(CHARS):.4f}")

    if args.guide:
        guide = atlas.convert("RGBA")
        gdraw = ImageDraw.Draw(guide)
        for i in range(len(CHARS) + 1):
            x = i * cell_w
            gdraw.line([(x, 0), (x, cell_h - 1)], fill=(255, 0, 0, 160), width=1)
        gdraw.rectangle([0, 0, atlas.size[0] - 1, atlas.size[1] - 1], outline=(255, 0, 0, 160))
        guide_path = args.out.with_name(args.out.stem + "_guide.png")
        guide.save(guide_path)
        print(f"预览线框图: {guide_path.resolve()}")


if __name__ == "__main__":
    main()
在本目录执行:
cd font
python generate_digit_atlas.py默认输出:T_DigitAtlas_16.png(4096×256)。
常用参数:
# 硬边版(更利落,适合 Nearest 采样)
python generate_digit_atlas.py --cell 256 --hard

# 软边抗锯齿(默认)
python generate_digit_atlas.py --cell 256 --soft

# 带红格线预览(检查对齐用,不要导入 UE)
python generate_digit_atlas.py --guide
4、怎么换字体
用 --font 指定 .ttf / .otf 路径即可;可选 --font-size 调字号。

# 例:Arial Bold
python generate_digit_atlas.py --cell 256 --hard --font "C:/Windows/Fonts/arialbd.ttf"

# 例:Consolas Bold + 指定字号
python generate_digit_atlas.py --cell 256 --hard --font "C:/Windows/Fonts/consolab.ttf" --font-size 180

# 例:自己的字体文件
python generate_digit_atlas.py --cell 256 --hard --font "D:/Fonts/MyFont-Bold.ttf" --out T_DigitAtlas_16.png
说明:
--font填字体文件的完整路径(不是字体显示名)。- 不传
--font时,脚本会按顺序尝试系统字体:Consolas Bold → Cascadia → Courier Bold → Arial Bold 等。 --font-size是最终格子上的字号;不设则按格子大小自动估算(约格子边长的 78%)。- 字太大容易顶格/吃边,可把
--font-size略调小,或保持默认。 - 生成后用 UE Reimport 替换旧贴图。
Windows 常见字体路径:
| 字体 | 路径 |
| Consolas Bold | C:/Windows/Fonts/consolab.ttf |
| Arial Bold | C:/Windows/Fonts/arialbd.ttf |
| Segoe UI Semibold | C:/Windows/Fonts/seguisb.ttf |
| Cascadia Code | C:/Windows/Fonts/CascadiaCode.ttf |
5、示例
暂无评论,来抢沙发吧~